
This comprehensive guide provides step-by-step instructions for installing the Honeywell Pro 6000 thermostat, ensuring a smooth setup process. It covers preparation, wiring, mounting, and system testing, helping you achieve optimal performance and energy efficiency for your home.
The Honeywell Pro 6000 is a versatile and user-friendly programmable thermostat designed to enhance the efficiency and comfort of your home’s heating and cooling system. With its sleek design and advanced features, this thermostat is ideal for both residential and commercial applications. It offers a range of functionalities, including programmable temperature settings, adaptive intelligent recovery, and compatibility with various HVAC systems.
Key features of the Honeywell Pro 6000 include:
- A large, easy-to-read digital display.
- Intuitive temperature control buttons for simple operation.
- Adaptive Intelligent Recovery, which learns your system’s behavior to maintain consistent temperatures.
- Compatibility with conventional and heat pump systems.
This guide provides a detailed walkthrough of the installation process, ensuring a smooth and successful setup. Whether you’re upgrading from an older thermostat or installing a new one, the Honeywell Pro 6000 is designed to deliver precise temperature control and energy savings. Follow the steps outlined in this manual to unlock its full potential and enjoy a more comfortable living space.
Preparing for Installation
Before beginning the installation of your Honeywell Pro 6000 thermostat, it is essential to prepare thoroughly to ensure a smooth and successful process. Start by gathering all the components included in the package, such as the thermostat unit, wallplate, screws, anchors, wire labels, and the installation guide.
Disconnect the power to your HVAC system at the circuit breaker or fuse box to avoid any electrical hazards during installation. This step is critical for your safety and the integrity of the system. Next, remove the battery holder from the thermostat to prevent accidental power-up during the process.

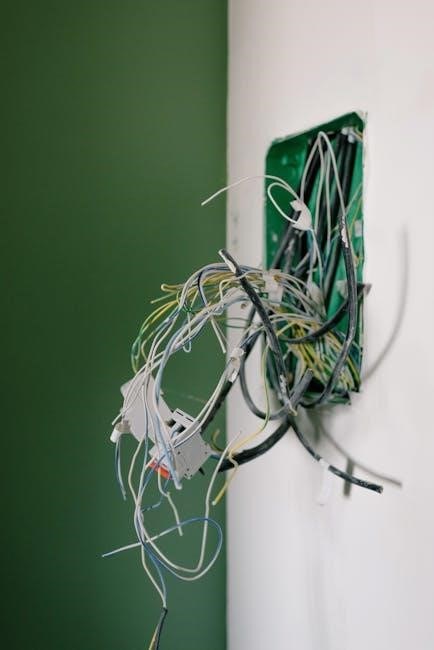
Label the existing wires connected to your old thermostat to ensure proper identification during the wiring phase. This step is crucial for maintaining the correct connections and avoiding potential issues with your HVAC system. Additionally, verify that the Honeywell Pro 6000 is compatible with your system type (e.g., conventional or heat pump) by consulting the specifications in this guide.
Lastly, ensure you have all the necessary tools on hand, such as a screwdriver, wire strippers, and a level, to complete the installation efficiently. Proper preparation will help you avoid common pitfalls and ensure your Honeywell Pro 6000 operates optimally from the start.
Removing the Old Thermostat
Before installing the Honeywell Pro 6000, you must remove the existing thermostat. Start by switching off the power to your HVAC system at the circuit breaker or fuse box to ensure safety and prevent electrical hazards.
Locate the old thermostat on the wall and remove the screws that hold it in place. Gently pull the thermostat away from the wall, taking care not to damage the wires connected to it. Label each wire with its corresponding terminal (e.g., R, W, Y, G, C) to ensure proper identification during the new installation.
Once the wires are labeled and free from the old thermostat, carefully pull them out of the wall. Remove any additional components or mounting hardware associated with the old thermostat. Properly dispose of the old unit, following local electronic waste guidelines.
Now, your system is ready for the installation of the Honeywell Pro 6000 thermostat. Proceed to the next step to install the wallplate and ensure a seamless transition to your new thermostat.
Installing the Wallplate
Start by pulling the wallplate away from the thermostat to access the mounting screws. Remove the battery holder from the wallplate to prevent any accidental power issues during installation.
Separate the wallplate from the thermostat by gently pulling it away. Ensure the wallplate is properly aligned with the wall studs or the location where the old thermostat was mounted. Use a level tool to confirm the wallplate is straight.

Mount the wallplate to the wall using the provided screws and anchors. Tighten the screws firmly but avoid overtightening to prevent damage to the wall or the wallplate. Insert the reference card into the designated holder on the wallplate for easy access to settings and instructions.
Once the wallplate is securely mounted, connect the labeled wires to their corresponding terminals on the wallplate. Ensure all connections are tight and properly secured. Double-check the wiring configuration to match your HVAC system type (e.g., conventional or heat pump).
After completing the wiring, verify that the wallplate is level and all components are securely fastened. This step ensures a stable foundation for the Honeywell Pro 6000 thermostat installation.
Proceed to the next step to wire the thermostat and complete the installation process.

Wiring the Thermostat
Before wiring the Honeywell Pro 6000 thermostat, ensure the power to your HVAC system is turned off at the circuit breaker. Identify the wires from your existing system and label them using the provided wire labels for easy reference.
Locate the terminal connections on both the wallplate and the thermostat. Match the wires to their corresponding terminals based on your HVAC system type. For conventional systems, common connections include R (24V power), W (heating), Y (cooling), G (fan), and C (common). For heat pump systems, additional connections like Y2 may be required.
Connect the wires to the appropriate terminals on the wallplate, ensuring they are securely fastened. Double-check the wiring configuration to avoid any mismatches, as this could lead to system malfunctions.
Once all wires are connected, proceed to mount the thermostat onto the wallplate. Ensure the thermostat is aligned properly and clicks securely into place. Finally, restore power to your HVAC system and test the thermostat to confirm all functions are working correctly.
Refer to the reference card or installation guide for specific wiring diagrams tailored to your system type. Proper wiring ensures optimal performance and prevents potential issues with your heating and cooling system.
Mounting the Thermostat
After installing the wallplate, carefully remove the battery holder from the thermostat to access the mounting clips. Align the thermostat with the wallplate, ensuring the reference card is in place for proper alignment. Gently press the thermostat onto the wallplate until it snaps securely into position.
Ensure the thermostat is level and evenly mounted. If necessary, adjust the wallplate to achieve proper alignment. Once the thermostat is mounted, insert the battery holder back into its slot, making sure it clicks into place.
Do not force the thermostat onto the wallplate, as this could damage the mounting clips or the unit itself. Verify that the thermostat is securely fastened and all connections are intact. Proper mounting ensures accurate temperature sensing and smooth operation of the HVAC system.
Avoid over-tightening the wall anchors or screws, as this could damage the wall or the wallplate. If the thermostat is not mounted correctly, it may lead to inaccurate temperature readings or system malfunctions. Double-check the installation to ensure everything is properly secured before proceeding to the next steps.
Programming the Thermostat
Programming the Honeywell Pro 6000 thermostat allows you to customize temperature settings for different times of the day, optimizing energy usage and comfort. Start by setting the current time and date using the function buttons. Next, navigate to the temperature settings menu to configure your preferred heating and cooling temperatures.
Select the system mode (Heat, Cool, or Off) and adjust the temperature using the up and down arrows. The thermostat features a 3-degree separation between heat and cool settings to prevent simultaneous operation. For programmable schedules, set temperature changes for specific times, such as waking up, leaving home, or sleeping.
Use the Adaptive Intelligent Recovery feature to enable the thermostat to learn your HVAC system’s response time, ensuring temperatures are reached by the scheduled time. Save your settings to apply the programmed schedule. You can also use the Hold feature to temporarily override the schedule without disrupting the programmed settings.
Test each mode and schedule to ensure proper functionality. This step ensures the thermostat operates according to your preferences and maintains energy efficiency. Refer to the reference card or user guide for additional customization options.
System Testing
After installing and programming the Honeywell Pro 6000 thermostat, perform a thorough system test to ensure proper functionality. Start by verifying the system type selected in the installer menu matches your HVAC system (heat pump or conventional). Test each mode individually: heating, cooling, and emergency heat (if applicable).
Observe the thermostat’s response and ensure the HVAC system activates correctly. Check for smooth transitions between modes and confirm the temperature changes as expected. Use the Adaptive Intelligent Recovery feature to monitor how the system adjusts to programmed settings. If issues arise, refer to the troubleshooting section or user guide for solutions.
This step ensures the thermostat operates seamlessly with your HVAC system, providing reliable performance and energy efficiency. Proper testing is crucial for identifying and resolving any installation or configuration issues early on.
Specifications and Compatibility
The Honeywell Pro 6000 thermostat is designed to work with a wide range of heating and cooling systems, including conventional and heat pump configurations. It supports multi-stage systems, offering precise temperature control for enhanced comfort. The thermostat features a digital display and is compatible with both 24V and 120/240V systems, ensuring flexibility for various setups.
It operates on battery power, eliminating the need for a common wire (C-wire), making it suitable for both new and retrofit installations. The Pro 6000 supports up to 3 heat stages and 2 cool stages, providing versatility for different HVAC systems. Its compatibility extends to gas, oil, and electric furnaces, as well as air conditioning and heat pump systems.
The thermostat’s wiring terminals include R, Rh, Rc, W, Y, G, O, B, and C, allowing for seamless integration with existing wiring. Its adaptive recovery feature ensures efficient temperature adjustment, while the programmable schedule offers energy-saving options. This thermostat is an ideal choice for homeowners seeking reliability, flexibility, and advanced functionality in temperature control;
Advanced Features Configuration
Configuring the advanced features of the Honeywell Pro 6000 thermostat enhances its functionality and customizes it to your specific needs. Begin by accessing the advanced settings menu using the function buttons. Navigate to the “Setup” or “Advanced Settings” option and use the temperature adjustment buttons to scroll through the menu.
Enable the Adaptive Recovery feature to allow the thermostat to learn your system’s response time, ensuring precise temperature control according to your schedule. Adjust the system settings to match your HVAC configuration, whether it’s a heat pump or conventional system, to optimize performance.
Utilize the temperature differential setting to balance comfort and energy efficiency by setting the range at which the system cycles on and off. Explore fan settings to control circulation, choosing between continuous operation or activation only during heating or cooling cycles.
Consider locking certain settings to prevent unintended changes. Before making adjustments, review the current settings and consult the installation guide for guidance. Ensure that wiring configurations support the features you enable. By carefully configuring these advanced options, you can maximize the thermostat’s efficiency and tailor its operation to your preferences.
Troubleshooting Common Issues
During or after installation, you may encounter issues with your Honeywell Pro 6000 thermostat. Start by checking the power supply to ensure it is properly connected. Verify that the circuit breaker or fuse hasn’t tripped or blown. If the display is blank, check the battery compartment for correct polarity and ensure the batteries are fresh.
If the thermostat isn’t responding to temperature adjustments, review the wiring connections to confirm they match the system configuration. Ensure the system type (heat pump or conventional) is correctly selected in the installer menu. Incorrect settings can lead to improper operation, such as the system not switching between heat and cool modes.
For issues with the adaptive recovery feature, reset the thermostat by removing the batteries for 30 seconds and then reinstalling them. If the display shows an error code, refer to the user guide for specific troubleshooting steps. Addressing these common issues promptly ensures optimal performance and comfort;
Final Check and Programming
After completing the installation, perform a final check to ensure all components are securely connected and properly configured. Verify that the wallplate is firmly mounted, the thermostat is correctly aligned, and all wires are securely attached to their respective terminals.
Next, access the thermostat’s programming menu to set your preferred temperature schedules. Use the temperature buttons to adjust the desired heating and cooling settings for each day of the week. Ensure the system type (heat pump or conventional) matches your HVAC setup, as configured during installation. Also, enable features like Adaptive Intelligent Recovery, which optimizes heating and cooling cycles based on your system’s performance.
Review all settings to confirm they align with your comfort preferences and energy-saving goals. Save your configurations and test the system by running through each mode (Heat, Cool, Off) to ensure proper operation. This final step ensures your Honeywell Pro 6000 thermostat is ready to provide efficient and consistent climate control for your home.
With the Honeywell Pro 6000 thermostat successfully installed and programmed, you can now enjoy enhanced comfort and energy efficiency in your home. This comprehensive guide has walked you through every step, from preparation to final programming, ensuring a seamless setup process. By following the instructions carefully, you’ve optimized your system for peak performance and tailored it to your specific needs.
The Honeywell Pro 6000 offers advanced features like Adaptive Intelligent Recovery and user-friendly controls, making it an ideal choice for modern homes. Proper installation and configuration ensure that your heating and cooling systems operate efficiently, reducing energy consumption and lowering utility bills. If you encounter any issues or need further adjustments, refer back to the troubleshooting section or consult the user manual for guidance.
Take pride in your successful installation and enjoy the benefits of a smart, programmable thermostat designed to keep your home comfortable year-round. Happy heating and cooling!